Another detail I have been working on is retaining walls. The split in track elevations between the A&O mainline along the back and the street running up front requires a significant length of retaining wall. I want to break up the wall by using several different types of walls and textures. One wall type I really want is cut and fitted stone. I have tried several different methods to achieve this but havent been happy with anything yet
! My newest attempt is inspired by a comment in a Model Railroader layout article as well as a technique shown to me by modeler Michale Duncan. Michale lives in Estes Park and is building an Sn2 tram railway with excellently crafted scratch-built structures. He has a blog at;
https://www.grtsn2.com/ that is worth exploring.
The MR comment mentioned using Lego blocks as a base for stone walls. I didnt quite understand the method and the accompanying photo didnt help much. After talking with Michale at the spring 2020 train show in Denver, I decided to try a technique that Michale uses to simulate rough cut stone. The secret is modeling paste in a gel medium. I used a 40% off coupon at Hobby Lobby to pick up a tub of this paste. It is found in the fine art paint aisle next to the tubes of oil and acrylic paints. I went with the Liquitex brand, retails for $16 for an 8 oz tub. The label reads; matte, opaque preparation of marble dust and polymer emulsion
used to build heavy textures and three-dimensional forms on rigids supports. Sounds like a lot of fancy words that mean make stones out of Legos. Or at least thats how I hear it!
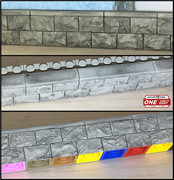
Here is what I tried. I dug through my kids Lego collection and gathered all the 2x2 block pieces. I roughed up one side of all the pieces using a nail file. I also gathered a selection of single row flat plate pieces to use as a cap for the blocks. This will cover the familiar Lego studs on the top layer of blocks. Next, I used a small trowel to apply the modeling paste to one face of each block. This is pretty much like putting icing on a cake. This actually went pretty fast, I knocked out 40 blocks in only a few minutes! After the paste has dried (a couple days) I used the nail file to clean up all the edges of the block face. To form a wall, simply play Lego with the blocks! I staggered the joints and glued each block using liquid cement for styrene with the paste textured side facing out.
I spray painted the assembled wall with a suitable stone color. To accent the stone texture, I applied dark wash of black and brown gouache thinned with Windex. A dry brushing using a lite cream color completed the shadow and light contrast.
If you dont have children to steal Legos from, they can be purchased online by the individual brick. If you find a Lego Store nearby, they sell bricks in bulk by weight. The color of the brick isnt important. There are also off brand bricks that could be used and I have noticed some at the local dollar store.
Once I get my completed wall on the layout and see how it looks in context with the whole scene, Im might seriously reconsider the stone wall structure for the passenger platform that I have previously started.