Author Topic: Mount Union Re-Development Committee  (Read 18179 times)

Bob

  • Global Moderator
  • Full Member
  • *****
  • Posts: 162
    • Bob's web site
Re: Mount Union Re-Development Committee
« Reply #15 on: November 15, 2020, 01:45:32 PM »
Amazing work, Rick! You're making me look like a slacker... which I am.

Bob

RickBacon

  • Jr. Member
  • **
  • Posts: 86
Re: Mount Union Re-Development Committee
« Reply #16 on: January 13, 2021, 05:19:15 PM »
It’s a new year, and only 6 months to go until the O Scale National convention…hopefully!  I found a couple model kits of true 1/48 scale vehicles that I want to use at the fuel dealer in Mount Union.  Both kits date back to the 1960s from Revell Models.  Revel actually had 4 basic kits that where released and re-released multiple times up through about 1996.  The earliest was a 1955 Kenworth semi-tractor with a moving van box trailer.  Rumor has it that the molds for the box trailer were damaged which now makes it a pretty rare kit.  Revell used the truck and part of the trailer in a “new” release for a missile transport truck.  The second kit was a late 40s early 50s White cabover semi tractor with a fuel tanker trailer.  This kit has also been re-issued several times.  The other two kits are a late-60s Chevy stake bed truck and a mid-50s Ford pickup, both released multiple times.  An interesting twist; a new model company called Atlantis Models, has purchased several of Revell’s old tooling sets and have re-released both the fuel truck/trailer and the Chevy stake bed.  These are old school plastic kits with several sprues of parts molded in a single color to include the wheels and no glass! Let the fun begin, building models!

For the Mount Union scene, I have chosen to use the fuel tanker trailer hooked to the Kenworth tractor.  Both kits are pretty straight forward, but I did modify the tractor a little.  I feel the tractor’s wheel base is a little too long, resulting in an awkward space between the cab and the trailer.  I cut an inch (4 scale feet) out of the middle of the frame and joined it back together.  I had to move the fuel tank mounts and shorten the drive shaft.  I added a platform and a spare tire behind the cab and a small step to reach them.  The toughest part was shaping the clear plastic for the windshield glass.  In order to tie the rig into the fuel dealer, I designed and printed some custom decals to match the dealership. Painting was pretty straight forward, and I got to use my new paint booth! Weathering is layers of; Dullcoat, back gauche wash, and dry brushed high lights.  Now Valley Petroleum Supply is ready to haul as much fuel as the railroad can spot! 


Rick Bacon
Windsor, CO

Jay Barnaby

  • Newbie
  • *
  • Posts: 4
Re: Mount Union Re-Development Committee
« Reply #17 on: January 16, 2021, 07:51:52 PM »
Great as always. Still have all those cars body shells we found in St Louis a thousand years ago?

I really need to start actually doing some modeling instead of just buying.  ;D

Jay

Oh, yeah... Bob you ain't a 100th of the slacker I am...
Jay Barnaby
Wichita, Kansas

RickBacon

  • Jr. Member
  • **
  • Posts: 86
Re: Mount Union Re-Development Committee
« Reply #18 on: February 01, 2021, 08:37:55 PM »
Another supporting detail... Left over from my fuel truck built was the parts to make a flatbed trailer. The original 1960s Revell kit came with a mid-50s vintage Freuhauf box trailer. It seems that the tooling for the kit was damaged and only the first release had the box trailer. In the later releases, the trailer is a flatbed using the frame and chassis from the original kit. Unfortunately, the resulting model doesn’t look very realistic as a flatbed. I did a little web surfing for 1950s Freuhauf box trailers and decided I could combine the remaining kit parts with some scratch building to make a decent trailer. Of course I had to imagineer the basic dimensions from a couple 70 year old photos and a lot of “what looks right”!

I used my reliable favorite; styrene! Go figure! Evergreen metal siding laid on edge looks pretty good for the stainless steel ribbed construction of the prototype. The real challenge was shaping the nose of the trailer. The curve is against the ribs! I had to make a wood and brass “buck” to wrap the styrene sheet around and dip the whole thing in boiling water to make the form take. It took several attempts to come up with the final solution.

The rear door details, lights, and nose details are just various bits of styrene in the right shape and location. All of the markings are photo details printed on photo paper to simulate metal signs attached to the ribbed sides. I made my own art work except for the Freuhauf logo and license plate which are pictures found on the internet.


Rick Bacon
Windsor, CO

RickBacon

  • Jr. Member
  • **
  • Posts: 86
Re: Mount Union Re-Development Committee
« Reply #19 on: February 01, 2021, 08:39:40 PM »
Here are some in progress pictures...


Rick Bacon
Windsor, CO

Bob

  • Global Moderator
  • Full Member
  • *****
  • Posts: 162
    • Bob's web site
Re: Mount Union Re-Development Committee
« Reply #20 on: February 02, 2021, 07:08:00 AM »
Great looking work as always! I particularly like the fixture you made to curve the styrene trailer end. Did you apply heat or just let the styrene relax for a while?

RickBacon

  • Jr. Member
  • **
  • Posts: 86
Re: Mount Union Re-Development Committee
« Reply #21 on: February 02, 2021, 09:40:20 AM »
Thanks Bob!

Heat is the key, or more accurately, even heat is the key. I first dipped the styrene piece in boiling water for several seconds to soften it. Than I quickly “wrapped it over the form and applied the rubber bands. After visually lining everything up to insure squareness of the ends, the whole form and piece was re dipped in the boiling water for about a minute. I further tightened and adjusted the rubber bands and let the whole thing set and cool for about 30 minutes.

Just that simple! 
Rick Bacon
Windsor, CO

Jay Barnaby

  • Newbie
  • *
  • Posts: 4
Re: Mount Union Re-Development Committee
« Reply #22 on: February 02, 2021, 07:08:09 PM »
Show off!!!


Looks great as always!

Jay
Jay Barnaby
Wichita, Kansas

Craig

  • Jr. Member
  • **
  • Posts: 68
    • Rio Grande 3rd Division
Re: Mount Union Re-Development Committee
« Reply #23 on: February 03, 2021, 04:39:47 PM »
Awesome job Rick.

I sure like those trailers. Need to pick up a few.
Craig
A&O Track and Electrical Crew

RickBacon

  • Jr. Member
  • **
  • Posts: 86
Re: Mount Union Re-Development Committee
« Reply #24 on: February 08, 2021, 10:33:19 AM »
I managed to get a 5 hour work window at the mothership this past Saturday. Task at hand was laying down the scenery base layer of dirt. Actually, about a large coffee can of special modeling dirt...from David’s neighbor’s yard! After all the bench work, roadbed, and sub base cracks were filled with spray foam, tape, and Stucto-lite, everything was painted brown with regular latex house paint. On top of this, I brushed a thinned mixture of wood glue and water. A fine layer of David’s special modeling dirt was sifted over the glue using a small tea strainer. This powdery dirt is the base scenery layer.

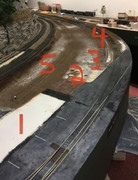
I added depth by using more dirt to build up the areas around the lumber yard(5), loading dock(3), and fuel dealer(4). The track at the lumber yard is fully buried to rail top height and the fuel dealer track is buried to tie depth. These areas when finished will represent having wheeled vehicle traffic on and around the trackage. Of course special attention was paid cleaning to the flange areas.  All of the dirt was than fully soaked by misting water with a drop of dish soap. A 50/50 mix of white glue and water was dribbled over the entire area to lock this base in place.

Next up will be vegetation and road details, as well as ballast for the main track. Fitting all the structures back into the scene won’t be far behind!


Rick Bacon
Windsor, CO

RickBacon

  • Jr. Member
  • **
  • Posts: 86
Re: Mount Union Re-Development Committee
« Reply #25 on: February 08, 2021, 10:42:04 AM »
Meanwhile...back at my workbench! The second try at the fuel dealer warehouse is coming along. The first try turned out to be visually too large and didn’t fit the scene. The second building is slightly smaller and noticeably shorter. It is a cinder block structure with a truck dock and a loading door rail side. Construction is all styrene using a .040 core laminated with cement block sheeting.


Rick Bacon
Windsor, CO

RickBacon

  • Jr. Member
  • **
  • Posts: 86
Re: Mount Union Re-Development Committee
« Reply #26 on: February 14, 2021, 11:32:45 PM »
I’ve finished most of the interior details and exterior painting on the fuel dealer warehouse.  Still have weathering to go. Lighting is installed, using a single surface-mount LED. I made a light fixture that covers a small hole in the wall with the LED mounted on the inside. Plenty of light passes through the hole and lights up the wall fixture on the out side while also illuminating the interior.  My limited iPhone photography skills don’t do the light fixture justice, as it is not as bright in person.


Rick Bacon
Windsor, CO

RickBacon

  • Jr. Member
  • **
  • Posts: 86
Re: Mount Union Re-Development Committee
« Reply #27 on: February 15, 2021, 07:39:12 PM »
I’m calling this one done! Final weathering is a wash of black gauche and some dry brushing to give texture to the details.  Signage is a mixture of homemade decals and photo-texture print outs.


Rick Bacon
Windsor, CO

RickBacon

  • Jr. Member
  • **
  • Posts: 86
Re: Mount Union Re-Development Committee
« Reply #28 on: February 15, 2021, 07:40:38 PM »
A peek inside the rail loading door...


Rick Bacon
Windsor, CO

Bob

  • Global Moderator
  • Full Member
  • *****
  • Posts: 162
    • Bob's web site
Re: Mount Union Re-Development Committee
« Reply #29 on: February 15, 2021, 07:51:19 PM »
Another great one, Rick.

Bob