Author Topic: Manns Creek 3D printed Shay, done  (Read 3033 times)

coaltrain

  • Newbie
  • *
  • Posts: 16
Manns Creek 3D printed Shay, done
« on: December 17, 2021, 06:14:24 AM »


Bob

  • Global Moderator
  • Full Member
  • *****
  • Posts: 162
    • Bob's web site
Re: Manns Creek 3D printed Shay, done
« Reply #1 on: December 17, 2021, 06:23:39 AM »
Wow! I'm dumbfounded. Great modeling!

RickBacon

  • Jr. Member
  • **
  • Posts: 86
Re: Manns Creek 3D printed Shay, done
« Reply #2 on: December 17, 2021, 09:09:54 AM »
Amazing work!  You have mastered the 3D print!  I cant wait to see pictures of it working on your layout!
Rick Bacon
Windsor, CO

coaltrain

  • Newbie
  • *
  • Posts: 16
Re: Manns Creek 3D printed Shay, done
« Reply #3 on: December 17, 2021, 09:17:03 AM »
here you go, video link
https://youtu.be/ztegGHwt0YU

david

  • Global Moderator
  • Newbie
  • *****
  • Posts: 45
Re: Manns Creek 3D printed Shay, done
« Reply #4 on: December 20, 2021, 09:45:32 PM »
Truly amazing Jeff. Such artistry along with technical skill. I particularly like the rust-deteriorated upper edge of the coal bunker. Not only does it look totally real, but I was left wondering if you included this "rot" into the printing.

And of course the painting and weathering are dead on. The addition of random buckets, piece of pipe, etc. tells a story in itself of back woods time and use. Excellent.

A Best of Show winner anytime, anywhere.

David

coaltrain

  • Newbie
  • *
  • Posts: 16
Re: Manns Creek 3D printed Shay, done
« Reply #5 on: December 22, 2021, 09:27:50 AM »
Thanks Dave.  Yes the rust is part of the print, and it is the actual rust shape of the prototype.  I took a side image of the locomotive and imported it into my model, then I traced the shape of the rust and used that shape to cut out the rust hole, then I added the repair plate they placed behind the rust hole.  It was fortunate that the prototype added that repair plate, if not that top edge would have been very fragile.

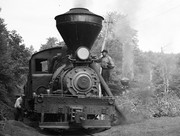
that large piece of pipe (silver duct) on the left side running board is used to discharge the cinders from the smoke stack, which is a story in itself.  The locomotive arrived with a straight stack, however to reduce fires they ordered a Radley Hunter design stack from Lima.  In the process of ordering a couple numbers got switched around, and instead of a stack sized for a narrow gauge shay they got a stack for a large standard gauge shay, but they made it work out and the oversized balloon stack is a signature feature of this shay.  Anyways, the Radley Hunter design uses vanes in the stack to throw cinders out of the smoke and they are collected in the outer part of the stack.  To drain the cinders the crew place that large silver duct under one of the discharge ports (one on each side) and removes the cap.  The duct directs the cinders out to the sides of the track.


coaltrain

  • Newbie
  • *
  • Posts: 16
Re: Manns Creek 3D printed Shay, done
« Reply #6 on: December 22, 2021, 11:11:10 AM »
Here is a different angle that really shows that big stack.  notice the large welded in rust repair patch in this side.


Craig

  • Jr. Member
  • **
  • Posts: 68
    • Rio Grande 3rd Division
Re: Manns Creek 3D printed Shay, done
« Reply #7 on: December 22, 2021, 04:56:04 PM »
Beautiful modeling Jeff!  I can almost smell the stack smoke coming off of it.

What resolution of print lines were you able to achieve with your printer?  I’m not seeing much in the way of step striations of the model.
Craig
A&O Track and Electrical Crew

david

  • Global Moderator
  • Newbie
  • *****
  • Posts: 45
Re: Manns Creek 3D printed Shay, done
« Reply #8 on: December 22, 2021, 07:42:22 PM »
That's all new information. I had no idea (about a lot of things actually :-\).

The printed rust-hole patch is just.....gorgeous. (Model railroader-speak)

I hope to run it some day on the new layout.

coaltrain

  • Newbie
  • *
  • Posts: 16
Re: Manns Creek 3D printed Shay, done
« Reply #9 on: January 04, 2022, 09:14:59 AM »
Beautiful modeling Jeff!  I can almost smell the stack smoke coming off of it.

What resolution of print lines were you able to achieve with your printer?  I’m not seeing much in the way of step striations of the model.

the printer is an Epax 4K mono screen, the resolution is 2160 x 3840, however the best way to reduce or eliminate lines is to orientate the parts as perpendicular to the print bed as possible, which I achieve by breaking the model up into pieces that can be printed the best way for each surface.  For example, the cab is two pieces, the back wall is one part and the rest of the cab is the other.  The back wall is printed vertical with the surface that would be the cab floor facing the print bed.  The rest of the cab is printed so the roof and the side walls are vertical and the cab front is parallel to the bed, printer supports are attached to the inside back of the cab front and along the back wall mating surface.  After the cab prints it is broken free of the supports and the support marks along the back edge are sanded smooth, the rear wall covers that surface once it is glued in place.

Craig

  • Jr. Member
  • **
  • Posts: 68
    • Rio Grande 3rd Division
Re: Manns Creek 3D printed Shay, done
« Reply #10 on: January 31, 2022, 10:19:40 PM »
Jeff....saw this shot and knew it had to be shared with you.

https://ngdiscussion.net/phorum/read.php?1,434107
Craig
A&O Track and Electrical Crew

coaltrain

  • Newbie
  • *
  • Posts: 16
Re: Manns Creek 3D printed Shay, done
« Reply #11 on: February 02, 2022, 10:57:16 AM »
WOW, that is one loaded down Shay, that winch and wood pile are huge.  thanks for sharing.