Author Topic: Getting some coal cars ready --- in N!  (Read 2248 times)

Junior

  • Newbie
  • *
  • Posts: 19
Getting some coal cars ready --- in N!
« on: July 25, 2021, 10:18:35 AM »
When I made my last visit to the Intermountain warehouse on Boston Ave (18-19 months ago), there were stacks and stacks of old shells, kits, sprues, and other assorted parts of all scales (mostly N and HO) laying around either waiting to be moved to the new building, or to be thrown into the dumpster.

When we were looking around, I noticed several flats of old N scale Huberts coalporter shells of various roads, and was told I could take whatever I wanted. I grabbed a few UP to finish a trainset I have that will run on UP trackage, then noticed several BNSF cars. I wanted a trainset of them, but upon further inspection, the cars were built in 11/2004, whereas I'm modeling spring of that year, just a few months too late! Then we came to the decision that I could pass it off as a brand new trainset making its first trip west, so I grabbed enough for a train of them as well (in addition to another trainset I'd already completed of older BN style cars). After this, I was told to take some detail sprues to complete the cars, and was given a large box of them.

I'd mostly just sat on these cars, as I didn't have much urge to work on them, and there's not really a reason to, with me having nowhere to run anything. The last few weeks, I decided to dive into these cars and see what we're looking at.

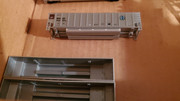
Here are the cars in the box I had put them in. As we can see, there are no wheels/trucks, or crossbeams inside.


Here's a closeup of a couple cars upright and one laying on its side.


With a couple cars completed, here's our first look at the detail sprues.


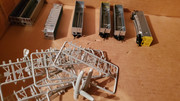
What did I get myself into?
~wko

Junior

  • Newbie
  • *
  • Posts: 19
Re: Getting some coal cars ready --- in N!
« Reply #1 on: July 25, 2021, 10:28:26 AM »
Our next step was to get the undersides of the cars ready, and all that entailed was a couple braces underneath, with a brake cylinder that rests on one of them.

Before we can do that, however, we've got to paint them to match the cars!


As a personal preference, my first step is to insert the brake wheel. There's a little piece of plastic that fits nicely into the hole on the side of the car, and only a couple of them fell into oblivion during this process!  ;D


With the brake wheel attached, the next step is to add the brake cylinder into the support piece on the underside. The plastic piece that juts out of the center of the cylinder fits nicely into the hole on the crosspiece...provided you're at the right angle. A couple of them required enough pressure that the crosspiece was starting to give, so I cut off the plastic joiner on the cylinder and simply glued it onto the brace.


On an older UP, the empty crosspiece has been popped into place (even though it's a clip-in fit, I put a couple drops of glue on), and the brake cylinder side is next. This shows the brake cylinder fitting nicely on the crosspiece. I used a disassembled Intermountain car that I had purchased to ensure I had everything in the right places. And by disassembled, I mean that all I had to do was take the one truck off! Haha.


With the underside complete, the next step is to work on what everyone's actually going to see.
~wko

Junior

  • Newbie
  • *
  • Posts: 19
Re: Getting some coal cars ready --- in N!
« Reply #2 on: July 25, 2021, 10:40:14 AM »
With the underside of the car complete, the next step is the crossbeams on the inside of the car, which help keep it from collapsing on itself.

Unfortunately, the beams on the sprues are millimetres too thick, so in order to have them straight in the car one must snip both sides of the beam. The top beam has had both sides snipped, while the bottom one hasn't. The leftover pieces on the left are about as thick as a thumbnail.


After taking the previous 2 photos, I slipped each of the beams into a car and this is what it looks like. I may not have cut a lot off each side, but it sure makes a difference! A few cars in, I noticed a couple of the thinner ones had fallen out, so I then started gluing them in, placing a drop of glue at the top of the beam supports and sliding the beam through the glue.


A few of them are done now, and things are starting to take shape. After the crossbeams, I put the trucks and wheels on each car, completing the car.


Time to rinse and repeat. A few down, only a lot more to go!  ;D
~wko

Bob

  • Global Moderator
  • Full Member
  • *****
  • Posts: 162
    • Bob's web site
Re: Getting some coal cars ready --- in N!
« Reply #3 on: July 26, 2021, 12:06:51 PM »
It is fortunate that "you have a friend in the model train business."

Bob

Craig

  • Jr. Member
  • **
  • Posts: 68
    • Rio Grande 3rd Division
Re: Getting some coal cars ready --- in N!
« Reply #4 on: July 27, 2021, 06:40:37 PM »
They look awesome Kirk.

Use those young eyes while you got em :). I’d be going cross eyed with that work for sure!!!
Craig
A&O Track and Electrical Crew

Junior

  • Newbie
  • *
  • Posts: 19
Re: Getting some coal cars ready --- in N!
« Reply #5 on: July 28, 2021, 03:35:14 PM »
Thanks so far guys! At this step, it's just a lot of rinse/repeat. Here's 3 photos showing the progress.

About halfway.


All 30 finally assembled, from the top.


From the side.


Next step: metallic silver spray can from Wal-Mart.
~wko

Junior

  • Newbie
  • *
  • Posts: 19
Re: Getting some coal cars ready --- in N!
« Reply #6 on: August 06, 2021, 04:21:06 PM »
Now that a can of shiny silver spray paint has been acquired from Walmart (and a promise not to paint the cashier's car! ;D) , the interiors of the cars can now be painted to match the exteriors. My big step here was to create a way to paint without getting it on the outside of the car where there's a different color. If we remember the November 2020 NCMRC Dispatch, my dad used a piece of notebook paper with a car cutout to paint the insides of his HO coal cars. Thus, my N Scale idea was hatched.

Rather than use a piece of notebook paper, I used an index card. Rather than holding it like I am in the photo, I've been using two fingers to hold it down, while holding the car with 3 fingers underneath, keeping the card flat. This has been working very effectively, once I brought home some rubber gloves from work! Haha


The difference of plastic to new-looking steel is pretty staggering! Looking closely at the far left of the image, you can see the tops of these cars are slightly yellow, making my holding of the index card a key thing.


I have currently painted about half of the cars' interiors, and the all-silver BNSF cars look fantastic with their matching innards! I seem to have forgotten all about picture-taking, as I haven't taken any more since that one, but the project continues to move forward.
~wko

david

  • Global Moderator
  • Newbie
  • *****
  • Posts: 45
Re: Getting some coal cars ready --- in N!
« Reply #7 on: August 08, 2021, 09:24:41 PM »
Looking very good, Kirk. Don't you love BIG projects!??!

Now how can we use them on the A&O? I have an idea. Stay tuned.

David
Grand Poobah

Craig

  • Jr. Member
  • **
  • Posts: 68
    • Rio Grande 3rd Division
Re: Getting some coal cars ready --- in N!
« Reply #8 on: August 10, 2021, 06:28:34 AM »
Those look great Kirk. Great job man!!!

David….is it still third rail if it’s dropped in between the O-scale track?  :)
Craig
A&O Track and Electrical Crew