Recent Posts
71
Member Projects / Modifying Tang Band 1815/1931 modules to fit in O scale hoods
« Last post by Big Train James on February 29, 2024, 02:17:04 PM »I was having a conversation with Bob about replacement motors for various locos, including the Red Caboose gp9. One thing led to another, and he mentioned a revision to his plans to use a Tang Band 1931 module in the fuel tank of the Red Caboose gp9, going with a smaller 1925 module instead due to size constraints.
I mentioned that I had modified the TB 1815 and 1931 modules to make them narrow enough to fit inside the RC gp9 hood, as well as some of the Atlas locos (gp60, sd40, mp15dc). I'll post the specs here for anybody that wants to try the same modifications.
First though, I'll offer a couple of caveats. First is that I based the modifications on fitting the modules into the Red Caboose and Atlas Shells. I can't speak for models made by any other manufacturers. I'm sure the modified modules will fit in brass locos, as it's really only the armor plate thickness plastic shells that present an issue. Second, the 1815 and 1931 modules won't fit inside the RC hood unless the motor (or drive towers, somethings got to give) is lowered closer to the frame. If the motor is in the stock position, the limiting dimension will be height rather than width. Lowering the motor, and ideally the entire drive line, is another topic entirely, and Bob is discussing that now in his own thread.
The modules have been milled down to 1.320" in width, +/- .001". That dimension was a factor of the inside width of various hoods, combined with a wall thickness dimension that Bob had mentioned years ago in a thread on the old forum. That old discussion was revisited here in the thread "Inside a Tang Band Speaker". It may be possible to make the modules a bit narrower, but I didn't need to find out. I based my goal width on the models I intended to install the modules in.
The length isn't as critical as the width, so I only removed enough material on the ends to remove the mounting tabs and clean them up like the sides. I have two modules in front of me, the lengths vary with one being 3.448" long and the other 3.465" long.
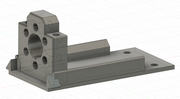
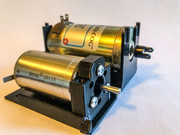
Once milled, the modules look like this:
1815 Module


1931 Module

Milling was performed on a Sherline mill, using a sharp 5/16" diameter cutter. The spindle speed can be fairly high, but the feed rate should be relatively slow. I don't have exact numbers for either. The trick is to keep the feed rate slow enough that the plastic doesn't heat up and start to melt. It will get gummy and tend to grab the cutter. Keep the depth of cut to .010" per pass, which helps with the heat and discourages the cutter from catching on the plastic.
A word of caution, milling the sides will remove part of the PC board strip connecting the plug to the solder pads. Originally I thought we used a file on the PC board to avoid dulling the cutter with the glass dust. However I was just told that it wasn't necessary to do that. When you get to the PC board, maintain spindle speed but reduce feed rate and let the cutter do the work. Being too aggressive could result in the cutter catching on the board, damaging it. By the way, removing that bit of PC board doesn't affect the traces, there is still continuity from the solder pads to the plug.
The other issue to keep an eye on is that on one of my modules, milling the sides revealed a short gap between the module face plate and rear housing. I suspect there was a lack of adhesive or sealant in that position. It only appears on one of probably eight total modules that were modified, so I think it's an anomaly. Following is a picture of one of the 1931 modules with the gap. If I push on the speaker cone, the passive radiator doesn't move in response, and the opposite is true. I plan to patch that hole with some epoxy eventually.

For reference sake, I measure the inside width of the RC gp9 shell at 1.358" just below the roof on either end of the dynamic hatch. I figure this part of the shell is held at a constant width unlike the bottom edge, but also I presume that the module would be placed closer to the roof than the walkway.
Theoretically the 1.320" width also allows the modules to fit inside common Atlas hoods, but it's a pretty snug fit. I'd really like to have a bit more room for a gap between the module and the shell sides, since I don't know if it's likely that the module will make the shell vibrate. But at this point I'm not sure how much more material is available is safe to remove from the enclosure.
I think that covers everything, at least everything I could think of at the moment.
Jim
I mentioned that I had modified the TB 1815 and 1931 modules to make them narrow enough to fit inside the RC gp9 hood, as well as some of the Atlas locos (gp60, sd40, mp15dc). I'll post the specs here for anybody that wants to try the same modifications.
First though, I'll offer a couple of caveats. First is that I based the modifications on fitting the modules into the Red Caboose and Atlas Shells. I can't speak for models made by any other manufacturers. I'm sure the modified modules will fit in brass locos, as it's really only the armor plate thickness plastic shells that present an issue. Second, the 1815 and 1931 modules won't fit inside the RC hood unless the motor (or drive towers, somethings got to give) is lowered closer to the frame. If the motor is in the stock position, the limiting dimension will be height rather than width. Lowering the motor, and ideally the entire drive line, is another topic entirely, and Bob is discussing that now in his own thread.
The modules have been milled down to 1.320" in width, +/- .001". That dimension was a factor of the inside width of various hoods, combined with a wall thickness dimension that Bob had mentioned years ago in a thread on the old forum. That old discussion was revisited here in the thread "Inside a Tang Band Speaker". It may be possible to make the modules a bit narrower, but I didn't need to find out. I based my goal width on the models I intended to install the modules in.
The length isn't as critical as the width, so I only removed enough material on the ends to remove the mounting tabs and clean them up like the sides. I have two modules in front of me, the lengths vary with one being 3.448" long and the other 3.465" long.
Once milled, the modules look like this:
1815 Module
1931 Module
Milling was performed on a Sherline mill, using a sharp 5/16" diameter cutter. The spindle speed can be fairly high, but the feed rate should be relatively slow. I don't have exact numbers for either. The trick is to keep the feed rate slow enough that the plastic doesn't heat up and start to melt. It will get gummy and tend to grab the cutter. Keep the depth of cut to .010" per pass, which helps with the heat and discourages the cutter from catching on the plastic.
A word of caution, milling the sides will remove part of the PC board strip connecting the plug to the solder pads. Originally I thought we used a file on the PC board to avoid dulling the cutter with the glass dust. However I was just told that it wasn't necessary to do that. When you get to the PC board, maintain spindle speed but reduce feed rate and let the cutter do the work. Being too aggressive could result in the cutter catching on the board, damaging it. By the way, removing that bit of PC board doesn't affect the traces, there is still continuity from the solder pads to the plug.
The other issue to keep an eye on is that on one of my modules, milling the sides revealed a short gap between the module face plate and rear housing. I suspect there was a lack of adhesive or sealant in that position. It only appears on one of probably eight total modules that were modified, so I think it's an anomaly. Following is a picture of one of the 1931 modules with the gap. If I push on the speaker cone, the passive radiator doesn't move in response, and the opposite is true. I plan to patch that hole with some epoxy eventually.
For reference sake, I measure the inside width of the RC gp9 shell at 1.358" just below the roof on either end of the dynamic hatch. I figure this part of the shell is held at a constant width unlike the bottom edge, but also I presume that the module would be placed closer to the roof than the walkway.
Theoretically the 1.320" width also allows the modules to fit inside common Atlas hoods, but it's a pretty snug fit. I'd really like to have a bit more room for a gap between the module and the shell sides, since I don't know if it's likely that the module will make the shell vibrate. But at this point I'm not sure how much more material is available is safe to remove from the enclosure.
I think that covers everything, at least everything I could think of at the moment.
Jim