Recent Posts

Pages: 1 ... 3 4 [5] 6 7 ... 10
41
Member Projects / Re: MTSE a German narrow gauge RR
« Last post by coaltrain on August 15, 2024, 12:09:48 PM »
I like the sliding door bridge, very clever idea.
42
Member Projects / Re: MTSE a German narrow gauge RR
« Last post by Bob on July 21, 2024, 10:06:04 AM »
Wow! The modeling is outstanding! Thank you for sharing it with us.

Bob
43
Member Projects / MTSE a German narrow gauge RR
« Last post by MichaelHH on July 21, 2024, 09:29:46 AM »
Hello from Germany,
my name is Michael and I am operating an 0n16,5 prototype layout of German island Rügen.
If your are interested on it , you will find all details by following link:
https://www.0e-club-hamburg.de/mtse-michael/
Unfortunately in German only, but google translator should work fine.
Greetings from beautiful Hamburg
Michael Schwertfeger
44
Member Projects / Re: Red Caboose GP9 remotor
« Last post by Bob on May 21, 2024, 01:42:03 PM »
One thing I've been obsessing over is how to improve and illuminate the Red Caboose GP9 number boards. The OEM polycarbonate inserts are nearly impossible to install and they are far thicker than the shell. They can stick out on both the inside and outside of the shell cutout. That's light leak city. Harrumpf.

One thought was to mill a brass cutting template for a thin clear styrene number board, but that would be likely to leak light around imprecisely cut edges and raised the problem of how to mount it in the shell.

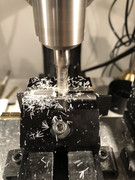
I decided to just go for it and clamped an OEM insert in the Sherline mill. Two parallels and a spacer raised it up in the vise with just the thinnest bit of the edge clamped. Too much grip on the vise could crack the part, but too little might let it fly out and be ruined.

Fortunately, with light 10 thou passes I was able to thin the boards without dislodging them and to a final dimension less than the thickness of the shell. A sharp Niagara end milll wider than the board left a super smooth but nice frosty finish, perfect for diffusing light.


A couple swipes with a fine file on the outer sharp bevel edge added a very slight bevel that made pressing the insert in place simply and easy to adjust. I think I will install the flat milled side to the outside and sand the inside to be a secondary diffuser.

One thing I noticed is that since plastic shrinks when it cools from a liquid, the centers of the number board castings were not flat but slumped a bit. That suggests that both sides should receive a cut to make sure they are flat.

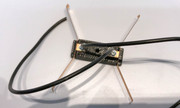
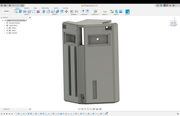
The lighting block for each end has also been refined a bit. There is a rabbet around the number board LED cavities for installation of a thin 0.010 styrene tertiary light diffuser. Also there is now a tab on the top for a small PCB board to aggregate the various LED wires to a single 5 wire harness going to the decoder. The PCB will be underhung to the tab with double stick tape. The wires are planned to be 30 AWG solid kynar wire wrap wire, which can hold its shape once formed, to a 2.5mm pitch JST XH connector.


A random thought: At least on some later EMD GPs, each number board had 3 incandescent lamps inside. Particularly on B&O engines I saw as a child, the number boards were translucent and one could see the hot spots of each bulb. What if I drilled 3 shallow holes on the inside of the inserts? Could that effect be effectively emulated?

Thoughts?
45
Member Projects / Re: All wheel pickup for P&D brass Blomberg trucks
« Last post by Bob on April 20, 2024, 04:52:08 PM »
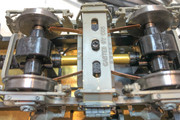
Here's an application of the 3D printed wiper blocks for one of David's F7B units. I tore into it because there was an out-of-gauge wheel that caused frequent derailments. The wiper screws are 0-80 and the mount to the spring plank 2-56. These holes were hand tapped since my FDM printer can't print useful threads at these miniature sizes.


And the final installation. I really like Rod Miller's wipers.


An astute observer may notice that the right side gear box is not tightly screwed together. I discovered that some of the wheel axle gear profiles changed between early and late models. When the screws were fully tightened, there was a once-around bind with the brass worm. Loosening the screws a tad allows the two gearbox halves to slightly move relative to each other. I applied Loctite to the 4-40 gearbox screws to keep them from loosening.
46
Member Projects / Re: All wheel pickup for P&D brass Blomberg trucks
« Last post by Bob on April 02, 2024, 04:02:58 PM »
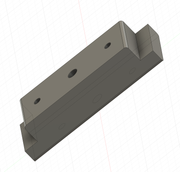
Found a need for 8 more trucks worth of wiper blocks. Instead of setting up the saw and mill for a short run, I decided to 3D print them. The design and printing took less time than subtractive machining in Delrin. The parts are not as precise and a little rough in finish, but they are fully functional.


47
Member Projects / Re: Red Caboose GP9 remotor
« Last post by Bob on March 28, 2024, 06:58:58 PM »
Jim -

I'm glad you are participating on this thread! You have helped me break out of some mental blocks and arrive at better solutions, for which I am appreciative.

I'm in no way concerned about insufficient top speed with the Portescap motor. In fact I still plan to change the P&D 15:1 reduction to 25:1 reduction. That should multipliy the motor torque by about 1.6, although I do not anticipate lack of torque to be an issue. It will, however, reduce the average motor current.

The A&O isn't a racetrack display layout. It is for guys who like to operate. Although it is in a huge basement, running fast on the mainline and getting to the next "town" in a matter of seconds doesn't satisfy and would be an undue stress on the dispatcher. Most trains do switching, and for that smooth low-speed control is preferable.

What top speed is appropriate for your models depends on how you want to run them. The Reading ran a lot of SW "pups" in mainline coal hauling. On the other hand, GCOR limits the top yard speed to 10 MPH, although many modelers run faster than that, seemingly trying to pop a wheelie when accelerating from a stop. When when stopping, they stop on a dime, which sometimes may unfortunately be in the brakeman's pocket.

I anticipate that the larger HO decoders, such as the 58240, should be able to handle the motor current. The thinner height opens a lot of possibilities.

I also don't expect the less powerful amplifier in an HO decoder to be an issue. Our ears respond to increases in SPL in a logarithmic fashion, so a 3W amp isn't 3X as loud as a 1W amp.

The keep-alive is a consideration. ESU sells good 3-wire PowerPacks. The small one has a single 1 Farad capacitor. The 5L decoder has two 1 Farad capacitors. The large PowerPack has two 5 Farad capacitors. But sometimes the longest run time isn't the best. How much trouble can a derailed locomotive get into in only 4 seconds? Can it meet our nemesis gravity?

As for lift rings, glad to hear your SD40-2 measurement matches. Also note that the cast base or washer of the lift ring is of a large diameter. For a while I was concerned that the P&D lift rings were about 30 thou in diameter, but that's about not oversize. If anything it is undersize.
48
Member Projects / Re: Red Caboose GP9 remotor
« Last post by Big Train James on March 28, 2024, 12:07:04 PM »
Coincidentally, I just measured EMD lift rings while at the Illinois Railway Museum during the Chicago meet.  The ones I measured were on an sd40-2, but they appear to be the same as the one in your photo.  I'm planning on having some brass castings done within the next month or two.  I'll share results when I have them.

Jim
49
Member Projects / Re: Red Caboose GP9 remotor
« Last post by Big Train James on March 28, 2024, 12:03:53 PM »
Hi Bob,
I have another pair of questions regarding the re-motor project.  I hope I don't tire you out tugging on your sleeve all the time.  ;D

I notice in your motor comparison matrix that the Portescap motor has a significantly lower no-load speed than either Pittman option.  Presuming that gear reduction remains the same without regard to choice of motor, does the lower top end speed present any issues for you?  I recognize that we seldom run our models as fast as they could go, so I suspect it's not a problem.

In a different context, where reduction is not predetermined, the no-load or rated speeds do affect a final gear ratio, which in turn affects torque.  It's been a bit of a balancing act as I seek a suitable motor for my switcher project.  It seems that many of the better quality motors have substantially lower no-load speeds compared to the Pittmans.

The second question is in regard to the use of an HO decoder, in particular one of the ESU Loksound variety.  Do the HO decoders have enough power to successfully feed the Tang Band modules?  Or to power a TB module and a smaller driver for the bell and horn, as I believe they have two speaker outputs.  Also, the large format Loksound decoders have onboard keep-alives now.  Are they integral or separate on the HO versions.  It would be nice to use an HO decoder for space and cost, although some of that may be offset if a separate keep-alive is required.

Jim
50
Member Projects / Re: Red Caboose GP9 remotor
« Last post by Bob on March 27, 2024, 08:41:02 PM »
That can be done for some grabs and other brass fittings, but not all. The top two end grabs have to be trimmed. There is very little plastic thickness between the cutout for the headlight LEDs and the number board cavity. Light leaks must be avoided.

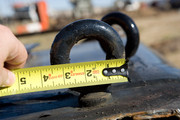
On the roof some of the lift rings are not critical but others may need to be flush to avoid tearing the speaker during insertion and removal. By the way, the kit plastic lift rings (and some brass ones we received from Bill McClung) are undersize. Attached is a photo of a GP7 being cut up in Loveland. The P&D brass parts (now out of stock) are the correct size, but can be difficult to cut.


Pages: 1 ... 3 4 [5] 6 7 ... 10