Recent Posts
1
A&O Projects / Re: Mount Union Re-Development Committee
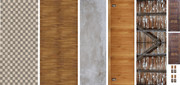
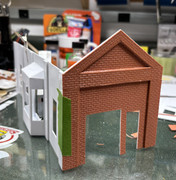
« Last post by RickBacon on June 22, 2026, 09:35:16 AM »Thanks Craig! I print on glossy photo paper. To my eye, the photo paper has a much sharper image. The glossy finish is killed off with a light spray of Dullcoat or dead flat spray after the textures are mounted to the model.
Several years ago while wandering through a thrift store, I spotted an un-opened box of 8.5 x 11 photo paper with a ridiculously low price somewhere in the single digits! It's a bulk package for commercial printing, something like 1000 sheets!. I have no problems running it through my HP ink jet printer using knock-off cartridges.
All the photo texture interiors and signs in Mount Union are printed on it! The white enamel interior walls of the Dave's Diner model are actually this photo paper without anything printed on it. I skipped the flat spray so the walls would be shinny.